
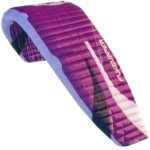
Your kite will most likely be the most expensive item of your kitesurfing kit, it is after all the power source!
So it’s important to know what you’re looking for when you’re about to splash out your hard-earned cash on your first kite.
So here I’ll take you through a guide to the best kites for beginners, what style of kite to look for, what to avoid and the various parts that go with the kite to make it work.
What Type of Kite?
Kite technology has come a long way in recent years, and most kites manufactured within the last 5 years will be good quality and reliable, as long as they aren’t damaged and have been looked after well.
But there are a number of different styles of kite available, all with different characteristics suited to different styles of riding and levels of skill.
You’ll hear terms used like “LEI (Leading Edge Inflatable)”, “SLE (Supported Leading Edge)”, “Foil-Kite”, “C-Kite”, “Bow-Kite”, “Hybrid”, “Delta”. And these all represent different types of kites with different characteristics of design and how they perform. So it’s worth looking briefly at what they mean and how they relate to what you should be looking for in your first kites.
Essentially the main characteristics you’re looking for in your first kites are:
Stability – By this we mean that the kite sits fairly easily where you want it to be and doesn’t flit around in the gusts or with the slightest twitch of the control bar. It gives you one less thing to have to think too much about if you know your kite isn’t going to mis-behave or drop out of the sky suddenly.
Wind range/ De-power – You want kites with a decent wind range of at least 10- 15 knots. This means you need less kites, but also that if the wind is gusty, picks up or drops off while you’re out, you can still control and use the kite.
Ease of Re-launch – You want a kite that sits easily on the water when you crash it and is easy to re-launch. Most modern kites are pretty good at this apart from maybe C-kites. But do check the reviews that are available before you buy.
Easy to use safety system – This is more to do with the control bar than the kite, but most kites are bought with a control bar and lines. Again, most modern systems are good. You’re looking for a system that is easy to trigger but can also be easily re-set after triggering, so that you can set off again after using it.
In another article, Kitesurfing Kites for Beginners, I detail 4 kites that I know from experience are great for beginners and beyond.
What Does it all Mean?
Let’s take a look at the various categories of kite design and what differentiates them and, most importantly, which type will be most suited to you as a beginner:
Kite design can be broken into a couple of major categories, Leading Edge Inflatable (LEI) and Foil.
Foil Kites
Foil Kites do not have an inflatable structure, they’re made up of a series of tubes (cells) which inflate naturally from the air-flow as they move along. They are flexible in shape rather than rigid like a LEI, and very similar to the trainer kite you hopefully will have used.
Foil kites have a loyal following and have a number of advantages, including the fact they don’t have to be pumped up at the beginning of your session and in light winds their lower weight compared with LEI’s means they will fly more easily.
Their major disadvantage, especially in the hands of a beginner, is that when they land on water they can be difficult to re-launch as they flatten out on the surface and can easily get swamped.
They’re also less predictable than a rigid inflated kite. This can make them more difficult to control.
They’re also about twice the price of LEI kites.
This is not to say you shouldn’t consider a foil kite at some point. But in my opinion, they’re not ideal for a novice.
For these reasons, this is all I’m going to say about foil kites.
LEI (Leading Edge Inflatable)
This category of kites make up easily over 90% of the kites you will see on the water and will be the main focus of our attention in this guide to best kites for beginners.
A LEI is essentially any kite that has an inflated structure of leading edge and struts. So it needs to be pumped up before you use it. The purpose of the inflated tubes which make up the leading edge and struts is two-fold –
Firstly to give the kite a fairly rigid shape so that it’s flight characteristics are reasonably constant.
Secondly, so that when the kite comes down on the water (which it will, whether you’re a beginner or advanced rider pushing your boundaries with new tricks), it floats and is easy to relaunch.
LEI Kite Types
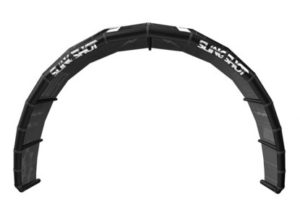
C-Kite
The “C” in C-Kite refers to the shape of the kite in the air when viewed from the front, They have a distinctive c-curve shape, square wing tips, and, when laid out un-inflated on the ground, pretty much rectangular shape.
The C-Kite is the original LEI design and virtually all the early kites were C-Kites.
Very simplistic in design they have no bridle (more on this later) with the kite lines being attached directly to the four corners.
Generally 4-lined although sometimes equipped with a 5th “safety” line to help with re-launch and de-power when it all goes wrong.
Old boys like myself learned our kiting on C-Kites and have fond memories and probably a few old injuries to show for it!
The main characteristics of a C-Kite are all related to the lack of bridle and C-profile of the kite. Without going into a scientific analysis, this results in a very direct “feel” a bit like driving a go-cart compared to a family saloon.
They also turn very quickly around a central point, so in experienced hands can be directed or re-directed very quickly around the sky to generate more power. This also means that they can be “looped” very easily in a very small radius loop compared with other styles which turn in a much bigger arc.
You’re unlikely to want to loop your kite in your learning stages as this is quite an extreme maneuver which generates a sudden burst of power – a bit like hitting the rocket boosters!
C-kites are also more suited than other types to “unhooked” riding, where you detach the kite from your harness, taking all the pull via your arms. Again, a fairly advanced action, which you are unlikely to want to do at this stage.
Another major difference between C-kites and other types is the relative lack of de-power and, as a result, narrow wind range. This is a safety issue for you as a beginner, as you’ll want to be able to simply let go of the control bar and let the kite safely drift to the low power zone when you fall off.
So I hope you’ve gathered from this that C-kites are not what you should be looking for if you’re at the beginner stage.
Supported Leading Edge (SLE) Kites.
This is a term you’ll still hear used, but is rather outdated and was coined when kite designers first started experimenting with bridle systems.
It basically covers every type of kite that has a bridle system where, unlike a C-kite, the front power lines are attached to the kite via a system of lines which distribute the power and change the shape of the kite as you pull the control bar back (“sheet in”) or push it forward (“sheet out”) to increase or decrease the power.
It also changes the shape of the kite slightly as you pull left or right on the control bar to steer the kite.
Don’t worry if this sounds complicated. The kite designers have done all the work to make the bridle system do what it’s meant to.
The bridle is permanently attached to the kite so that all you need to do is make sure it isn’t tangled (very straightforward) and attach your front power lines to the fixed connection points (“pig-tails”).
The whole purpose of the bridle system is to make the kite easier to fly, control and de-power. The magic takes place without any input from the rider, apart from steering and sheeting the bar.
Every kite other than a true C-kite falls into this category, and as a beginner, I would advise you to buy a kite which has a bridle system. All the other kite types we’ll look at have a bridle system.
There’s a lot of marketing hype put out by kite manufacturers. Each new kite they design has to differentiate itself in some way from last year’s model. But essentially any of the following categories of kite will suit a beginner and also be suitable once they become more proficient.
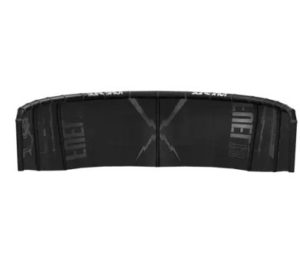
Bow Kites
The “bow” refers to the shape of the kite when viewed in the air from the front. Imagine the gentle curve of a bow (as in bow and arrow) and that is the shape of a bow kite.
There are many variants in terms of the shape of the kite when un-inflated on the ground, but generally they’ll have a swept-back leading edge, fairly rounded wing tips and a slightly convex trailing edge.
All bow kites have a bridle system and will generally have 4 lines, although some will have a 5th line, which is mainly a safety feature to allow the kite to be totally de-powered (“flagged out”) if the safety release is triggered.
All of these features are designed to make the kite easy to fly and control and almost all kite schools will use this type of kite to teach on.
There is a trade-off between out-and-out power and maneuverability between C-kites and bow-kites, but that’s not a bad thing in your first kite. You’ll get a bigger wind range and the kite will be far more stable in gusty conditions.
The various features also mean the kite will have almost total de-power if you let go of the control bar and will be easier to re-launch from the water. Another factor is that the bridle system absorbs a lot of the pull from the kite so it will feel less aggressive than a C-kite.
These are all good things when you’re learning as there’s a lot going on at the same time, and knowing the kite is not likely to give you any nasty surprises is a definite advantage!
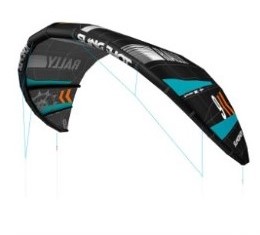
Hybrids
These combine features of both C-kite and bow-kite. So unlike a true C-kite there will be a bridle system. However, the kite will have more of the shape of a C-kite to give it some of the advantageous characteristics of a C-kite, such as pulling power and turn speed.
However, they will also incorporate many of the safety features of a bow-kite, such as wind range, de-power and ease of water re-launch.
There is a huge variety of hybrids on the market and they will usually be called “Hybrid C” or “Hybrid Bow”, which indicates which style they are closest to. You’ll also hear terms such as “Open C”, which usually indicates a strong bias towards C-kite characteristics.
A Hybrid Bow kite is not a bad compromise for a confident beginner who feels they may progress quickly to more advanced moves, but choose carefully and read plenty of reviews, looking out in particular for wind-range, de-power and water re-launch.
Delta Kites
These are a variant of the Hybrid Kite and are noticeable by their very swept-back leading edge and convex curved trailing edge, with tapered wing-tips. when laid out un-inflated on the ground they have a distinctive “D” shape.
These characteristics make them easier to re-launch from the water as the wing-tips have less tendency to catch in the water. They can also generally be used in lighter winds compared to the same sized kite in a different style, but this often comes with slightly less high wind ability.
Like other hybrids they can have a bias either way between bow and C-kites, so you’ll hear terms like “Delta C” or Delta Bow”, indicating which they are most similar to.
A lot of kite schools are using Delta Bow kites because of their ease of re-launch, and the right one can be a good choice for the ambitious beginner.
Just a word of warning though if you’re buying second-hand. Some of the earlier models had a tendency to “invert” in the water, which basically means they turn through the lines and can get tangled. So, if you are thinking of buying a second-hand delta kite, steer clear of any made earlier than about 2015.
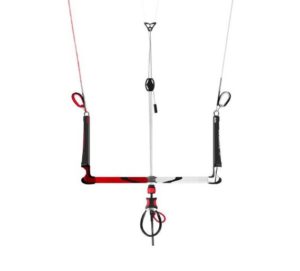
Control bar and Lines.
The control bar is probably the most important part of your whole kite set-up. It connects you, via the kite lines to your kite and is the point where all the steering, powering/de-powering, trimming and safety systems take place.
It’s also the most complicated part of the whole kitesurfing set-up so don’t worry if the next few paragraphs sound a bit bewildering.
A big part of your first lesson will be understanding the control bar and what each part does, and what I’m doing here is just reminding you what makes up the control system.
Your steering lines are connected to the ends of the bar and to the rear corners of your kite.
The power lines are a more complicated matter and where there is more variety between different systems and kites.
But generally speaking, assuming a standard 4-line kite, the power lines are attached at the kite end to the bridle and at the other end will meet in a “v” shape at some point above the bar, depending on the set-up. They will be attached to a swivel mechanism and a power and safety line will be attached to this.
The power and safety lines run down to the bar and through a hole in the middle of it. They attach below the bar to the “chicken-loop”, which hooks onto your harness and is secured to it by the “chicken stick” (also lovingly and more commonly known as your “donkey dick”).
At some point either above the bar or below it is a trim system, usually a pair of lines or straps with a cleating mechanism. These allow you to change the length of the power line to increase or decrease the angle of attack of the kite, thus changing its minimum and maximum wind range.
The chicken loop mechanism also contains the primary safety release which, when pulled, releases the chicken loop and sends the kite to the ground or water in a completely de-powered state.
In the event that you use the primary release, you will still be attached to the de-powered kite by a safety leash which attaches to the safety line at one end and, at the other end, to your harness.
This leash also has a release mechanism (the secondary safety release) which, when pulled, completely detaches you from the kite and lines. This is clearly a last resort as it means your kite is free to blow away downwind.
The control bar, when the chicken loop is attached to your harness can be slid backwards and forwards along the power-line to increase or decrease the power in the kite.
The control bar is usually made from a combination of carbon reinforced plastic or fiberglass, sometimes with a steel core.
The power lines themselves are generally made of an extremely strong nylon material known as Dyneema and each will have a breaking strain of at least 350lbs. The stronger the better! the lines on the bars I currently use have 800lbs on the power lines and 500lbs on the steering lines.
My advice when you’re buying your first kites is to buy the bar and lines that come with the kite. That way you can’t go wrong.
Although most 4 line kites will work with most 4 line bars, this is not always the case. Bars also come in different lengths with longer bars being appropriate to bigger kites.
You won’t necessarily need a bar for each kite as one sized bar covers a range of kite sizes and a number of adjustable length bars are now available so that one bar fits all kite sizes.
If you’re buying new kites it’s straightforward, just buy the bar that goes with the kite.
Secondhand is more complicated. Make sure the kite comes with it’s appropriate bar and MOST IMPORTANTLY, make sure every part of the bar and lines system is in good condition. Examine and ask whether there are signs of wear anywhere, particularly in the lines. Any frays or knots where they shouldn’t be should set alarm bells ringing.
If you buy a kite that comes without the bar and lines, consider buying a new bar and lines to go along with it. This is the most important part of your kit by far and a broken line or snapped chicken loop will usually ruin your day.
If there’s one main cause of kitesurfing accidents it’s failure of the lines or control bar system, but a well maintained bar and carefully checked lines before you launch the kite will avoid this occurrence.
So in Summary
There’s a lot to consider when you’re buying your first kite. But again, put it in perspective. This is a fairly major purchase of a piece of equipment that is vital in an extreme sport. If you were buying a car or a parachute, you’d want the best your money can buy, so do plenty of research and take advice.
In another article “Kitesurfing Kites for Beginners” I’ve featured some kites that I know from experience will see you through from the point where you’ve had lessons and have grasped the basics of flying a kite, right through your intermediate progression and on to advanced kiter. Take a look.
And if you’d like any help or have any comments on this matter please feel free to leave a message below or email me at adrian@kitemadworld.com
Affiliate disclosure: As an Amazon Associate I earn from qualifying purchases, and, as the owner of this website I may also receive a small commission for any purchase you make as the result of clicking a link
